

Okay so here we go. This project is fairly simple and (my version) is rather cost effective. I know the original one is made out of a lot better materials (most significantly her choice of wood), but since I am all about budget I went el cheapo on my supplies.
This is what you will need:
3 - 1in x 4in x 6ft boards = total cost $8.25
Wood Stain = $3.24 (I used wood stain paint in semi-transparent easier to use then real stain)
Cheap 2 inch Paint Brush = $1.15
2 inch Oil Board Stencils = $2.98
White Crafter's Paint = (I already had this, but I think its like $1 for a little bottle)
Picture Frame Hooks = Again I already had these, but expect to pay like $2 for a set
14 - 2 inch nails in a dark color = Also had these lying around, but nails are pretty cheap
So my total investment = $15.75
Yours might be as much as $18.75 or less if you have more of the above supplies.

So I started off with 3 long boards that looked like this.

Then I cut them into even smaller boards.
9 - 2ft boards to be exact.
You will need 7 for the front and 2 for the back.
(If you don't have a hack saw or a skill saw Home Depot can cut the wood for you)

Then I stained the front and sides of all 9 boards using a cheap brush and my can of wood stain paint. If you go to Home Depot I chose Padre Brown for my stain color. (I also used less then 1/2 of this small can for all 9 boards to give you an idea of how much it covers).

I dipped the brush in lightly and tried to work as much of my stain into the wood without over saturating it. Sort of like using a mild version of a dry brush technique. This allows the wood grain to come through since I used a semi-transparent stain instead of a real stain. Real stain requires more coats and a lot more work to get the right color, but it does look awesome.

And this is what it looked like after 1 coat and it dries in like 5 minutes.

And these are the boards after staining. I was extremely pleased. I didn't know what to expect since it was my first time using the semi-transparent stain, but I was very happy.
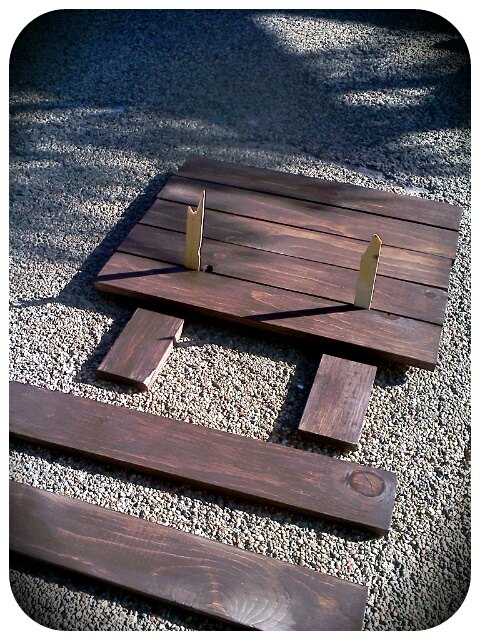
Once they were dry I laid 2 of the boards down for the back to which I would attach the front boards. I spaced the 7 front boards evenly apart using a paint stirring stick broken into 2 pieces.

I use my cell phone for all my photography so I apologize about the inconsistency with my editing. But that's what you get for using a 3 megapixel LG Droid instead of an SLR. Oh well. Anyhow this is what it looked liked after I was done. I nailed each board into the back boards twice. Meaning that each board ended up having 2 nails in it. One nail into each back piece. You can't see them in this photo, but I staggered the nails around so that they looked like they were sporadically put in. If you nail them into a pattern it detracts from the stenciled lettering.

And here is a side view.

I let my wood boards cure overnight to ensure that I was 100% pleased with the final look of the stain before I painted the lettering. Then I grabbed a small round brush, my white craft paint and the oil board stencils. I was extremely paranoid about the spacing of the lettering and although it is not perfect, its good enough for my first run at a project like this.

Again I used a dry brush technique when applying the paint so that it didn't look so perfect. I wanted the letters to look aged like in the one I saw on pinterest.


I would say the lettering took me about an hour from start to finish. My only qualm is that the "AS" is too far separated. Being that it was my first word, I didn't know how close or far apart to space the letters and it was further apart then I liked. I just went with it and although I notice it, it isn't a huge problem.

I used a hammer and a pair of pliers to install my frame hooks and wire. I went with this version because we are renting and less holes into the wall is better and its A LOT easier to hang a picture straight when you use the wire. When 2 nails are involved you need a level and 5 extra hands and its a hideous mess.

I just tapped my hooks into the back with the hammer and then twisted them in the rest of the way by hand. I measured the appropriate amount of wire, cut it with the pliers and then twisted it tightly around the edges to secure it. Super easy and very sturdy.

And this is how it looks hanging in my house.
For $15.75 its my FAVORITE piece of artwork. This is also a great project for other verses, phrases, short poems, life motto's etc.
And of course my final comparison picture...

I Pinned it. Then Made it. And hung it on my wall!
** So a few things....
1.) I most definitely would have preferred to use lowercase stencils, but after 3 days of searching for them in a 3 inch size (without paying $20 on the internet for them) I gave up and settled with all capital letters. My capital letters were 2 inches, because 3 inch caps was too overwhelming for the 4 inch boards.
2. I also would have loved to have used 2 in x 4 in boards as in the original, but that would have doubled the weight of this project and required bigger nails and a screw/wall anchor to hang it in our rental. All things that were not good.
3. Lastly, take note that my version of this project is roughly 28 inches by 24 inches so about 2 feet (plus) x 2 feet and the original project is 12 inches x 12 inches. I wanted mine bigger to make more of statement and this also worked in my favor by using smaller boards. Because once again it would have been EXTREMELY heavy if I used 2 inch x 4 inch boards.
Even considering all of thee above I really love how it turned out. I hope my version will give you a better idea of how to approach any similar projects you might want to accomplish in the future.
Brittany Jo Sojka, Lauren Lund, Christy Zimmerman Cameron and 3 others like this.
ReplyDeleteMelissa Perea Lauren Lund - I know you said you liked this on Pinterest so I wanted to show you how EASY it was to make ; )
Saturday at 10:05pm · Like
Jeanne-Marie Grewe I'm in love with you. You are my hero.
Saturday at 10:06pm · Unlike · 2 people
Melissa Perea Jeanne-Marie Grewe as I am in LOVE with you! (and your kids) Which btw I got a missed call from you, but no message... are you having separation anxiety?? because I am :(
Saturday at 10:07pm · Like
Jeanne-Marie Grewe lol...I almost left you a message...but then I figured you wouldn't check it. :) I'm having a DIY project malfunction. Go to my make for the kids board, find the garden, look at the "pot hangers" and YOU tell me where the heck to find them...cuz I'm out of ideas!
Saturday at 10:09pm · Unlike · 1 person
Kristin Sauter So I spent like 2 hrs looking at projects on that site last night. I have like 20 things I want to make . Ahhhhhh!
Saturday at 10:12pm · Unlike · 1 person
Dolores Basaldua Lawrence Sunny, this looks so fantastic!
Sunday at 1:09am · Like
Lauren McKinley Looks like we may have some matching art in our households... I've been looking for something to replace a mirror in our entryway and I'm thinking this is it! Matching due dates, matching midwives, matching delivery rooms (?) ... just trying to keep it consistent. :)
Yesterday at 1:42pm · Like
Jacqueline Lewis I AM IN LOVE! amazing! Fantastic! Absolutely incredible! :)
Yesterday at 2:40pm · Like
this is great! i'm a recent pin addict and love how you show the pins you love and then how you made them. i found you thru your comment on the knife block project, which i'm planning on doing this weekend. in red! we also live in a rental and would love to see any posts you care to write about how to decorate/organize/use your space when you can't do anything permanent to the space.
ReplyDeleteGail isn't Pinterst amazing?! I have been an addict since day 1. Let me know how your knife block re-do goes I would love to see one in red :) I will be doing a lot of posts on non-permanent decor in the future so stay tuned!! Rentals can be just as fun as owning a home, but without all the high cost of maintenance!
ReplyDelete